目次
ヘッダーがありませんtrixbox Pro and trixbox CE are both very powerful PBX systems that offer a full range of features for small and medium businesses. trixbox Pro has been designed to be a rock-solid PBX system that has a simple interface for handling the needs of most small and medium businesses in the world. trixbox CE on the other hand, is an open-source product designed to be an application development platform for custom applications such as a dialer, a billing platform, or a CTI interface. With a few simple steps, it is possible to link trixbox Pro and trixbox CE together in order to pass calls back and forth between the two systems. This involves creating the IAX2 trunk and configuring the dial plans. To do this, we need to know the IP addresses and extension mapping for both systems as shown in figure A below.

As you can see, the trixbox Pro system is configured with IP address 192.168.200.18, and hosts extensions 7000 through 7999. The trixbox CE system is configured with IP address 192.168.200.198, and hosts extensions 6000 through 6999. We now have enough information to create the IAX2 trunk between the systems.
***NOTE: This document assumes that both systems are on the same LAN, however if you are linking systems through the Internet, or with a firewall between them, you need to ensure that UDP port 4569 is open between the two PBX's.Let's start by configuring trixbox CE. Browse to your system's IP address and switch to Admin mode. Click on 'PBX --> PBX Settings' to get to the PBX Settings panel. Click on 'Trunks' and then click on 'Add IAX2 Trunk.'
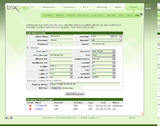
Use these settings for your IAX2 trunk:
Outbound Caller ID: (whatever you want it to be...I left it blank)
Never Override CallerID: <unchecked>
Maximum Channels: <blank>
Disable Trunk: <unchecked>
Monitor Trunk Failures: <blank> Enable <unchecked>
Dial Rules: 7xxx (this is the extension map of the trixbox Pro system)
Outbound Dial Prefix: <blank>
Outgoing Settings
Trunk Name: TotrixboxPro
PEER Details:
host=192.168.200.18
username=trixboxb
secret=12345
type=peer
Incoming Settings
User Context: trixboxa
USER Details:
secret=12345
type=friend
host=dynamic
context=from-internal
Registration
Register String: trixboxb:12345@192.168.200.18

Click 'Submit Changes' followed by the orange 'Apply Configuration Changes' bar at the top of the screen.
What we have done here is configured our outbound trunk to go to the IP address of the trixbox Pro PBX, and will use 'trixboxb' and '12345' as the authentication credentials. We will configure the opposite side of this trunk in trixbox Pro. We have also configured the incoming side of the trunk using the credentials 'trixboxa' and '12345'.
Now, we need to configure an Outbound Route to use this trunk to dial the trixbox Pro system. Click on 'Outbound Routes' and enter in the following information for your outbound route:
Route Name: ToPro (can be whatever you want)
Route Password: <blank>
Emergency Dialing: <unchecked>
Intra Company Route: <checked>
Music On Hold?: default
Dial Patterns: 7xxx
Trunk Sequence: IAX2/TotrixboxPro

Click 'Submit Changes' followed by the orange 'Apply Configuration Changes' bar at the top of the screen.
We are now done configuring the trixbox CE side of our IAX2 trunk. Now onto trixbox Pro!
Log into http://cp.trixbox.com with your tbadminNNNNNN username and password (where NNNNNN is your trixbox Pro Server ID). Click on 'Options --> voip' to add a new VoIP account. Enter in these settings:
Route Name: TotrixboxCE
Provider: Other / IAX2
Username: trixboxa
Register: yes
Password: 12345
Server: 192.168.200.198
Expand 'Advanced' and set 'Qualify' to 4000.
Click 'Add VoIP Account.'

We have just configured our outbound IAX2 trunk, but we also need to configure the inbound side. Click on 'Options --> voip' again and enter in the following settings:
Route Name: trixboxb
Provider: Other / IAX2
Username: trixboxb
Register: No
Password: 12345
Server: 192.168.200.198
Expand 'Advanced' and set 'Qualify' to 4000.
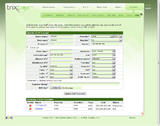
Click 'Update VoIP Account.' Your new VoIP account should now look like this:

Note that there is no 'Register String' for this 2nd trunk since it is for inbound connections only.
We now need to configure the dial plan to dial out to the trixbox CE PBX. Click on 'Options --> dial plan.'
*** NOTE: If you can not change your 'Prefix' setting, you need to first go to 'Options --> settings' and set 'Change Dial Out Prefix' to 'yes.'
Add a new dial plan entry using these settings:
Prefix: 6
Dial String: xxx
Description: TotrixboxCE (can be whatever)
Type: Local Call
Route: 1st: VoIP: TotrixboxCE
Strip Digits: 0
Prepend: <blank>

We have now configured trixbox Pro to dial through the IAX2 trunk anytime someone dials a 6xxx extension.
We are not quite done with trixbox Pro yet however. We now need to get into the back end and modify the iax.conf file, and then set it immutable so that changes we make will not be overwritten.
Use Putty, SecureCRT, or another SSH program to get into your trixbox Pro's Linux CLI and change directory to /etc/asterisk:
cd /etc/asterisk
Now, edit the iax.conf file:
nano iax.conf
Scroll down to the [trixboxb] section and change the following two lines to match this:
host=dynamic
context=internal
CTRL+X to exit followed by 'Y' when asked to save.
Now we need to set iax.conf immutable so that it can not be overwritten:
chattr +i iax.conf
To verify that it has been set immutable run:
lsattr iax.conf

----i-------- iax.conf
Now, go into the Asterisk console and reload the IAX2 protocol:
asterisk -r
> reload chan_iax2.so
Back at the trixbox CE system, you can either reload Asterisk with an 'amportal restart' or go into the Asterisk console and run a 'reload chan_iax2.so' to reload IAX2 only.
At this point, extension to extension dialing should be working between the two systems!
- このページは役立ちましたか?
- タグ (タグ編集)
- ここへのリンク
ファイル 6
| ファイル | サイズ | 日付 | 添付したユーザ | |||
|---|---|---|---|---|---|---|
| img8.jpg 説明なし | 106.87 kB | 2008年 12月 28日, 21:25 | Admin | アクション | ||
| img9.jpg 説明なし | 71.24 kB | 2008年 12月 28日, 21:25 | Admin | アクション | ||
| imgA.jpg 説明なし | 141.95 kB | 2008年 12月 28日, 21:25 | Admin | アクション | ||
| imgB1.jpg 説明なし | 137.58 kB | 2008年 12月 28日, 21:25 | Admin | アクション | ||
| imgC.gif 説明なし | 9.41 kB | 2008年 12月 28日, 21:25 | Admin | アクション | ||
| trixboxPro_to_CE_IAX2_trunk.jpg 説明なし | 52.37 kB | 2008年 12月 28日, 21:25 | Admin | アクション | ||


