IVR設定例 : ダイヤルされた番号で通話をルーティングする
目次
- 1. サブメニューを作成する
多数の言語に対応させたIVRを作成することは簡単です。例えば、「お電話ありがとうございます。英語をご希望なら1を、スペイン語をご希望なら2を、日本語をご希望なら3を押してください」(各言語の部分はそれぞれの言語で発声します)というIVRを作成できます。これはスキルベースルーティングと呼ばれています。
サブメニューを作成する
IVRを作成するときには、必ず通話が行き着く最終地点について考えておきます。ここでは、お客様が選択した言語によって、通話が行き着くサブメニューは異なりますから、この各言語ごとのサブメニューを作成しなければなりません。

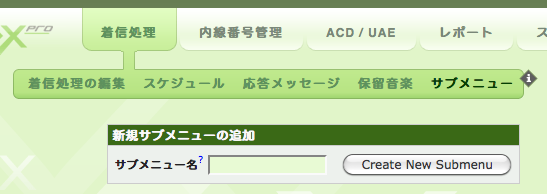
- 着信処理をクリックし
- サブメニューをクリックし
- 新規サブメニューの追加ボックスで、サブメニュー名を入力します。
- Create New Submenuボタンをクリックします。
Next we need to add steps into our sub-menu. A simple example would be playing a voice prompt offering callers additional options like:
For Billing - press 1
For Sales - press 2
For Support - press 3
Where all these prompts are rendered in the caller's chosen language. Once the caller makes a selection, we may forward them to a Queue, or perhaps just a single extension using the Keypress functionality of the system.
Here is a completed submenu for callers who speak Japanese:

In the image above, you can see that we have a very simple Japanese language submenu. The caller hears the same voice prompt three times with short pauses in between to allow the caller ample time to make a choice. The keypress options configured only apply to this particular submenu.
Many of the keypress options presented are an extension. Therefore, this submenu represents the final desination for the caller: a live person.
Let's look at the other English language menu:

This English language submenu is nearly identical to our Japanese language submenu, but the keypress options have been mapped to other extensions. Both possible end-points for a caller have been configured at this point.
Now we return to configuring the main menu:

Our main menu is configured to play a voice prompt and offers the caller three choices: English, Japanese, or the Operator.
Please read How do I edit the main menu? for detailed information on configuring your main menu and all submenus (all of the options are the same).
Once you complete configuration for your skills-based IVR, the configuration is immediately applied to your system, and inbound callers will hear your main greeting offering two languages.
